Tuesday, May 22, 2012

ART JOURNAL ADDITION

Just a quick moment to add an art journal page that I just completed.  I really do like how this came out.  I am learning to like that once-dreaded yellow!  ;-)


The quote I used is truly mine!  I searched quotes about dreams, but found none quite so perfect as this one!

Thanks for coming by.  Leave a comment so I will know you were here!

Cheers!

Thursday, May 17, 2012

CREATING YOUR OWN CORRUGATED PAPER FOR ART JOURNALING

Before losing the momentum I have going here, I wanted to do the flip side of my art journal page that I completed on Tuesday.  Mainly, because a scrappy friend of mine noticed that I had removed the journal page from my spiral-bound art journal and had asked how easily they go back in.  I will add a P.S. and let you know the answer to that!

In the meantime, I had watched a video tutorial by Journal Artista (who, by the way, works in a corrugated box factory!) on how to create one's own corrugated paper for use in paper crafting.  The required supplies included paper, glue and a "crimper," and I had them all!  If you're thinking, "Hmmmmmmmm, what's a crimper?" here is a picture:


And here is what is does:


Place your card stock between the two rollers, squeeze the blue and orange handles together with your left hand, and turn the orange crank with your right hand (reversing, of course, if you are left-handed).  This crimper is by Fiskars and can be purchased in your local craft "big box" store for short money--especially with a coupon!

Next, I took a brown ink pad and rubbed it several times over the crimped paper until I was happy with the effect:


At this point, I adhered the corrugated paper to my already prepped (Gesso, of course) journal page and set it aside to dry while I worked on my top layer.  As you can see below, I am going for the grunge look (which I am told is pretty much opposite the "Victorian" look (prim, proper and pretty).  I first tore the right edge of the patterned paper, then tore a piece off the lower left corner.  Next, I cut an X in two locations on the paper (shown here by pencil marks). 


I used the tip of the utility knife to lift the four corners of the X's and began to tear away the paper.


When I liked the look, I added some brown ink to the outside edges and some lighter ink to take away the "whiteness" of the torn paper.  It was then time for a bit of decoration and journaling.  When I first got into paper crafting, I got sucked into to buying *way* too many stamps.  It's not that I don't *like* them, I just don't *use* them!  For this project, I wanted to use some stamping.  I took a seat in front of my boxes and boxes of stamps and had a great walk down Memory Lane!  I finally chose two that seem to describe me perfectly--even after 68 years!


For those of you who know me well, you know that I struggle with journaling on my artwork, and struggle even more with handwritten journaling.  I decided to tackle both hurdles here!

Here's my art journal page entitled, "I DON'T DO MORNINGS!"  The journaling reads:  "@ 68, I have yet to outgrow the desire to sleep late."


OK, here's that P.S.  The page went perfectly back into my bound art journal!  WooHoo!

Thanks for stopping by to view my blog.  Please take a minute to leave a message so that I know you were here!

Cheers!

Tuesday, May 15, 2012

USING PHOTOS IN ART JOURNALS

I was so happy with the result of my last art journal page that I was motivated to try another.  With Mother's Day this week, I decided to create a page using a photo of my mother.

If there is an easy way to do something, I will find it!  I have read a lot recently about transferring photos to other media (for instance, packing tape) for using on art journal pages.  Since I work a lot with paper  in both scrapbooking and cardmaking, I figured why not just print the photo onto paper!  I am happy with the result.  First, the finished page:


Now, we'll inspect the details and I'll show you how I arrived at the finished page.  As is usual for me, I prepped my page with Gesso (an excellent paper primer) and let it dry completely--it just takes minutes.  I then squeezed out a bit of acrylic ink into my paint palette and added to that an equal amount of water to thin it.  Using a brush, I covered the entire page with horizontal brush strokes


I had already decided on the elements I wanted to use and spent a few minutes pushing them around the page until I was happy with the arrangement.  I had also decided I wanted to construct the page by laying these elements, so needed to decide on that process as well.


I decided to "anchor" the page by adding the largest element first.  I added Mod Podge (an adhesive) to my page, then quickly added the dictionary page with the definition of mother.  I decided to fold this element a couple of times both to reduce its size and to add interest.  I then covered it with another layer of Mod Podge (this time, using it as a sealer).  


I added the lace ribbon next because I wanted it behind my mother's photograph.  It is actually "lace tape," which means it comes with an adhesive back.  For this reason, I neither prepped the surface nor needed to seal it.


The next layer was to be my mother's photograph.  As I mentioned, I did print it on "copier" paper in a 3"x4" format, then tore the edges to add interest.  Due to its size, I Mod Podge'd (is that a verb??) the back of the photo, then placed it on the page.  I then added a layer of Mod Podge to seal it.


The next element to be added was the clock--or, rather, "half" a clock.  (The first half had been used on a card many months ago, and I was happy to be able to use the second half here!)  


If you check back to the finished page above, you will notice that I later added some of the background paint to the clock because it seemed too crisp and clean).  

The finishing touches came by way of a pen--recording both the dates and the page title, "Mom."  The arrow came as an afterthought, but I immediately liked it because of its color!


Thanks for taking this walk down Memory Lane with me!  I appreciate that you have come here to view my blog, and hope you will leave a comment to let me know you were here.

Cheers!

Monday, May 14, 2012

ART JOURNAL TECHNIQUE (bubble wrap)

I mentioned a few weeks ago that I had started an art journal.  Now, while I do describe myself as a scrapbook artist, I will never claim to be an artist of any other genre.  But, still, that desire to create in other media is still within me!  So, I do try!  I have created quite a library in Pinterest (Kay Wallace) of tutorials and examples of others' art journal pages.  One technique that interested me was that of using bubble wrap!  Here's my finished art journal page:


But, let's back up.  I begin by "preparing" every journal page on which I work by applying a coat of Gesso.


It curls just a bit when wet, but dries and flattens within minutes, and I am ready to proceed.

For this page, I used actual dress pattern tissue paper for my background.  I tore it into small random sections, trying to get a bit of the printed directions on most all pieces.  As an adhesive, I applied a bit of Mod Podge to my page, then quickly added a bit of the torn tissue paper.  I added a second layer of Mod Podge over the tissue paper, and then moved on to the next area, always overlapping the layers.  This process creates "wrinkles," which you do want as it adds a bit of texture.  I continued this process until my whole page was covered with tissued paper.  I allowed this to dry overnight.


The fun really began when I cut a small square of bubble wrap and "painted" the bubbly side with red paint.  I then used it as a stamp in two places on my page (I forgot in all my excitement that normally elements are added in 3's!).  I attempted to dry the ink with my heat gun, but finally gave up and allowed it to dry overnight.


Next, I used the same red ink (mixed with a bit of water this time to thin it out a bit) to add circles to my page.  I used those small measuring cups that often come atop cold remedies.  I used a smaller cap and white paint to create the smaller overlapping circles.


The last step was to add my "title" to my page.  I used a well-used stencil and a black Flair pen to create the words READ and WRITE.  Two things I love!

Thanks for coming by!  Please do take a moment to leave a comment so that I will know you were here!

Cheers!

Saturday, May 5, 2012

ALTERING A TIN BOX

Sources of Inspiration

Your source(s) of inspiration can be obvious, or, sometimes, surprising!  There were two sources of inspiration for my project today.  The first came from an obvious source, a scrapbooking blog!  I daily follow a blog of a very dear friend of mine, Roni Johnson.  You can find Roni here, and I would heartily recommend that you visit her blog.  Recently, Roni has been showing followers how to alter a tin box for a Mother's Day gift, even showing us how to create backgrounds for ATCs (Artist Trading Cards) to include in the tin.  You can see this post here.

My second source of inspiration came from my brother!  Although I had all the supplies to follow Roni's directions and alter my Altoid box, I had not yet started.  As I sat talking with my brother (visiting from the Dominican Republic), he opened a metal box and took out a cigar cutter that he had ordered online.  He was about to discard the metal box, when I said, "Hey!  I'll take that!"  And the rest is now history.

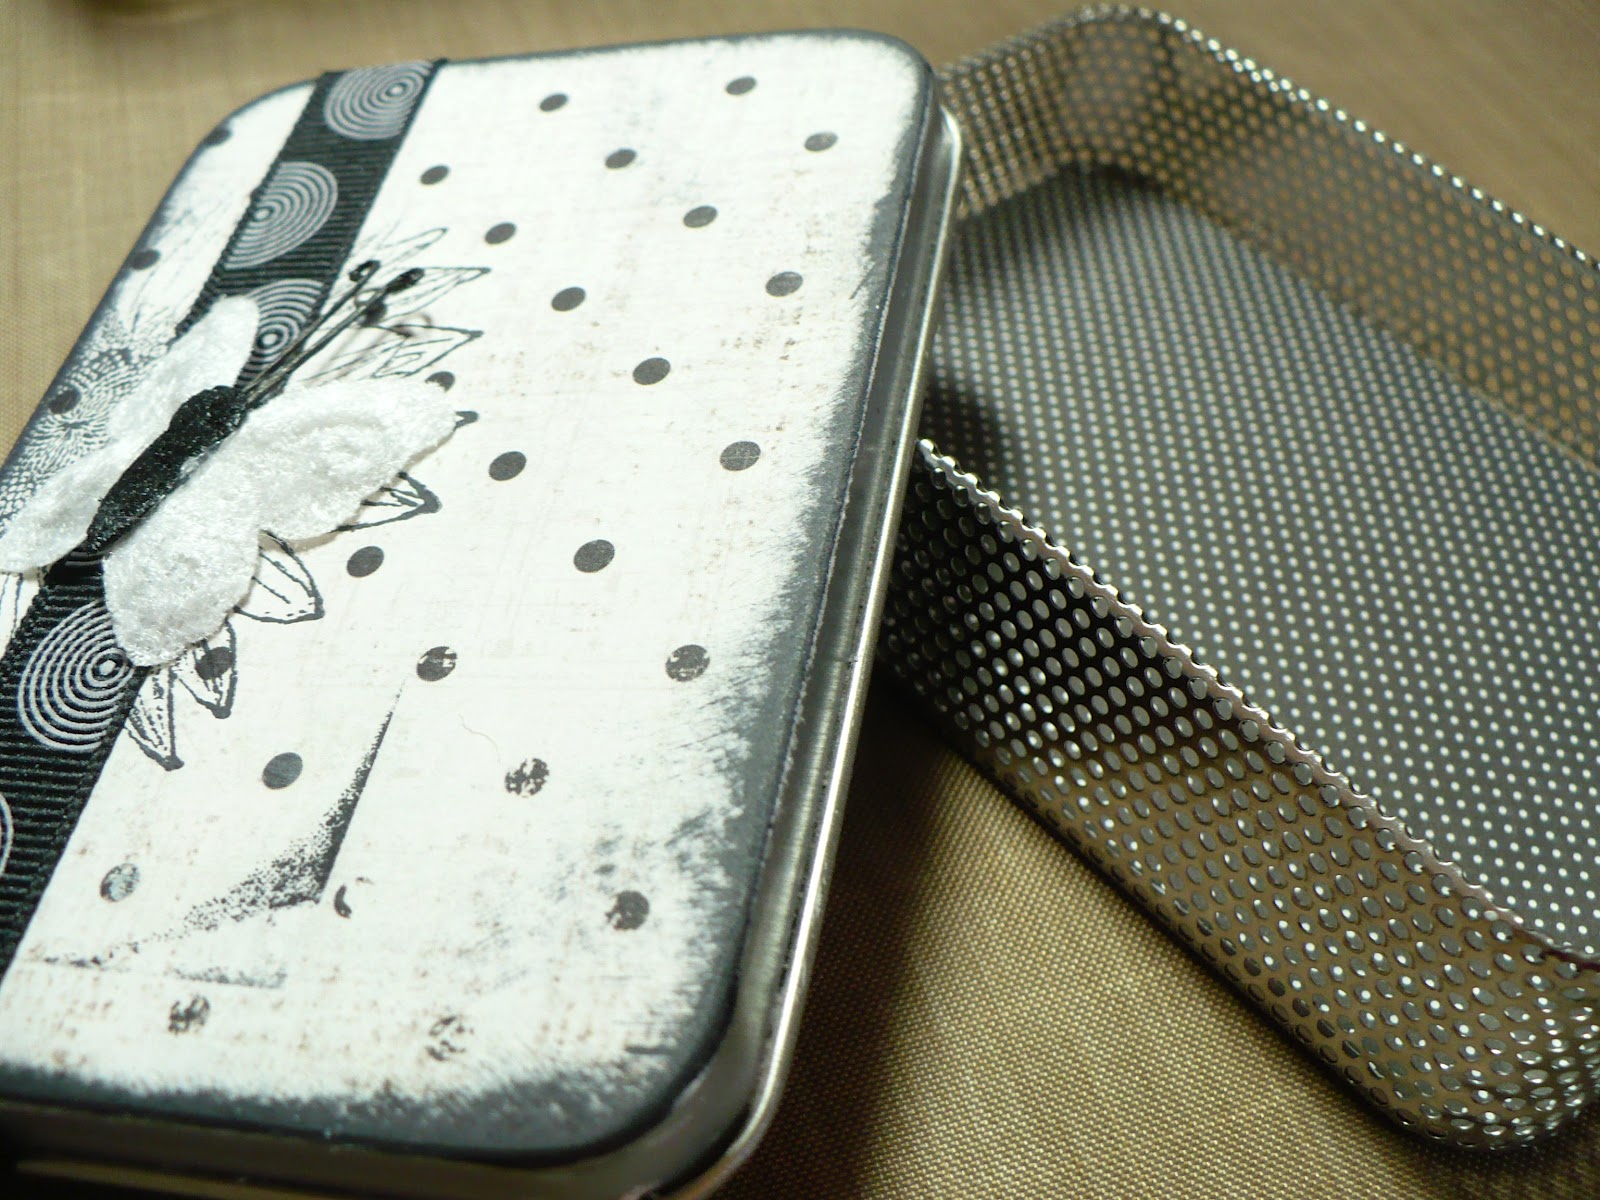
Today is National Scrapbooking Day, so I wanted to do something creative.  When I arrived in my scrap loft (that's fancy for 3rd floor), there was that metal box!  I didn't really need to do much with the tin because it was already beautiful with its mesh sides (lacking on that Altoid box!).  According to Roni's directions, I did sand the top, bottom and insides of the lid and base so that it would  greedily absorb the coat of Mod Podge (adhesive) I was about to apply.

Next, I went to my scrap drawer and found 4 different patterned papers.  Using the top of the lid, I traced around it on each sheet of paper (making minor "fitting" adjustments as I progressed).  Although I generally tease you with the details, today, I will show you the (almost) finished project first.  This is the top and bottom of the tin (note that stylin' mesh).  After applying my adhesive to the outside of the lid, I attached my first piece of patterned paper.  I sanded the sides of the paper so that they conformed perfectly to the edges of the lid.  I then used a black ink pad to add a bit of color and "aging" to the sides.  After adhering the paper to the inside of the lid, I added a ribbon around both the outside and inside of the lid.  Then, I embellished the outside with a butterfly.  I then added the patterned paper to the bottom.


Once inside the tin, I added an ATC made by Karen Ladd (received in an ATC swap many years ago on the About.com: Scrapbooking website).  To add dimension, I used pop dots underneath it.


Next, I added the fourth patterned paper to the bottom of the base.


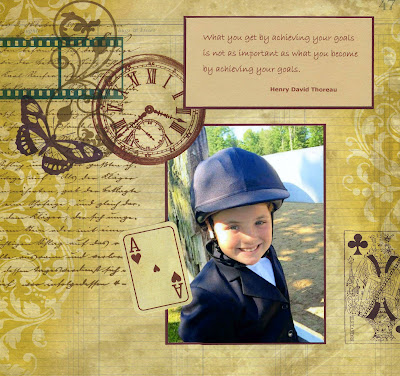
I liked Roni's idea of filling this tin with ATCs, but, by now, time is running short.  I remembered my 3-ring binder of ATCs in which I keep both ATCs made by me and those traded or given to me.  Perhaps I should have mentioned this before, but I did not create this tin for a Mother's Day gift, but for my sister Sandy's 70th birthday being celebrated by family next weekend.  As I looked through my binder, I found 9 ATC's that immediately reminded me of Sandy for one reason or another.

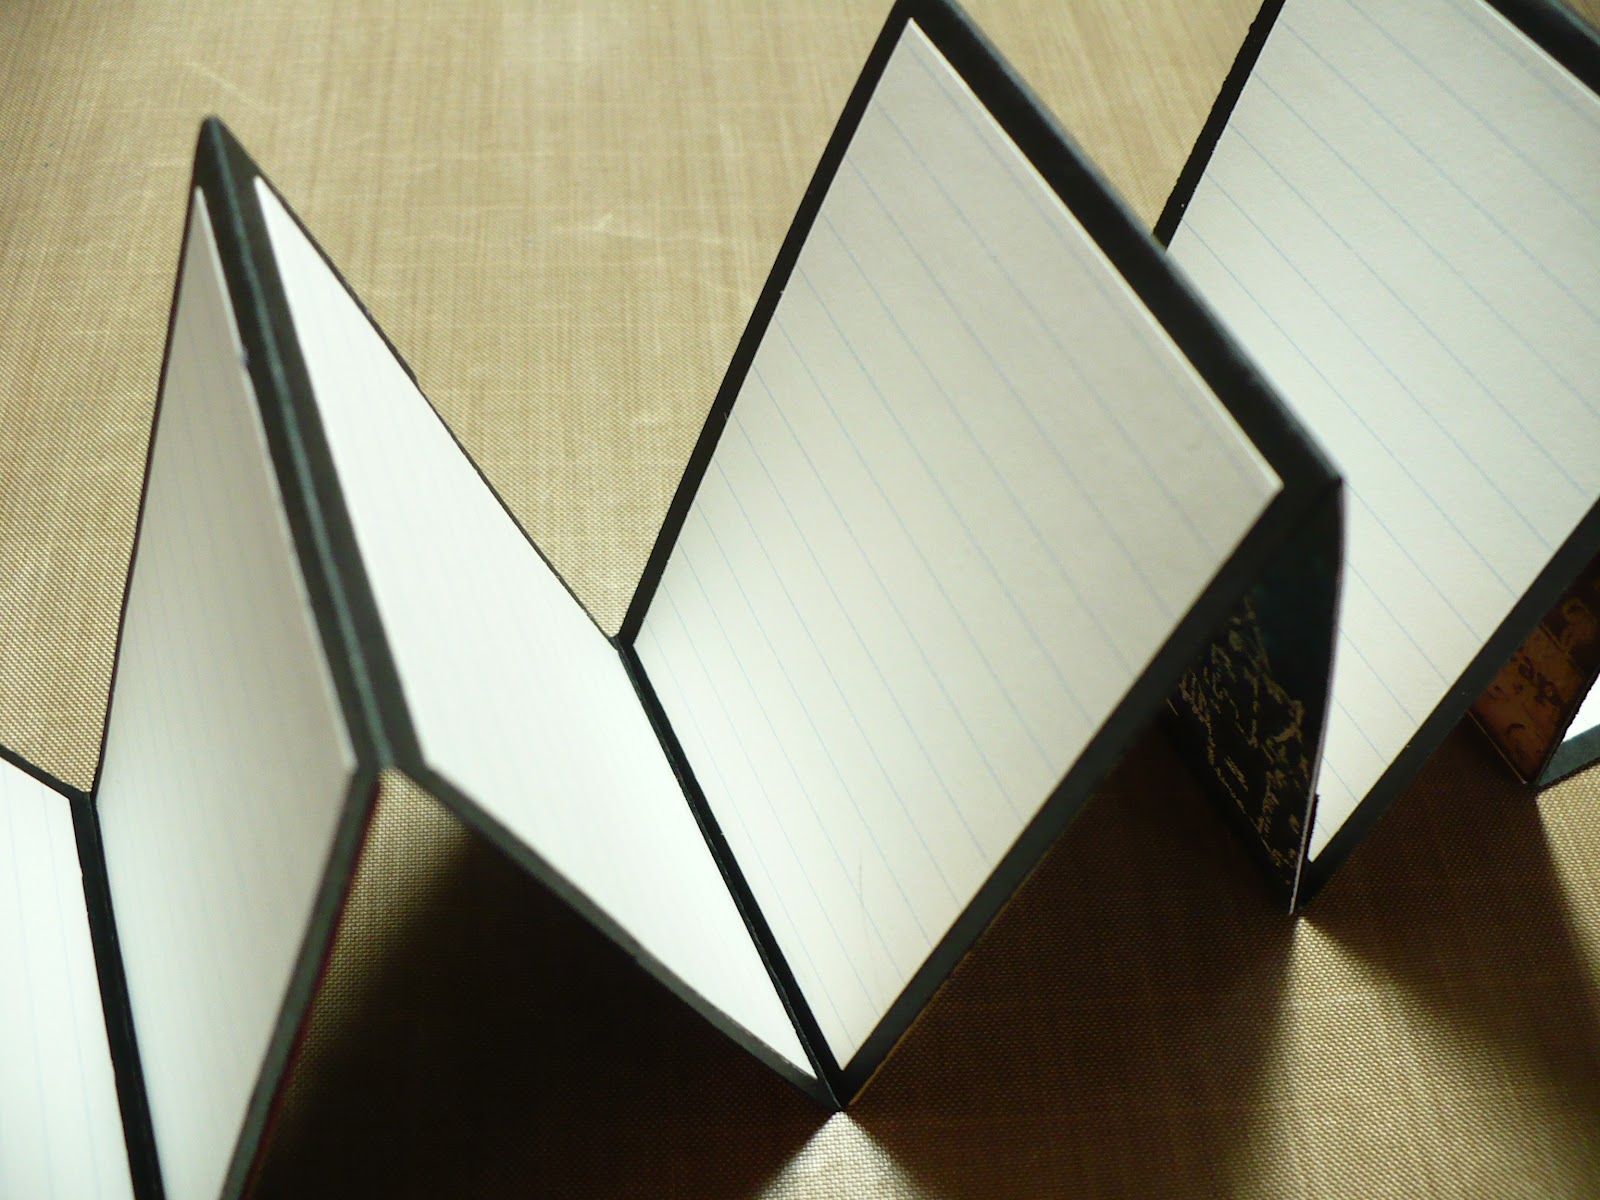
I cut strips of black card stock on which to mount the 9 ATCs.  I scored these strips so that they would fold easily into an accordian.  I allowed for a "tab" so that I could join the strips together.  On the back of each of the folds, I adhered paper cut from a lined index card for ease in writing on them.


Each of these ATCs will certainly jog a memory for my sister, and I am hoping she will write down that memory.  The first, "Sister," was made by me and will definitely arouse all kinds of memories; the 3rd, "Eiffel Tower," would be her year of studying abroad; and, so on.  Here are a couple more ATCs I used made by special people in my life.  The first ("Juice of the Gods") by Roni Johnson, the second ("YADDA YADDA YADDA") by Tammy Birkhead, both crafters that continue to inspire me!


Now, all put together and back in the tin:


I thoroughly enjoyed making this project and thank both Roni and my brother for my National Scrapbooking Day adventure into the arts!  Happy 70th birthday, Sandy!!

Please leave a comment to let me know you were here!

Cheers!

Thursday, May 3, 2012

PARENTS REMAIN IN US

Working with The Past

My husband's sister recently gave my husband a photo of their mother taken on May 11, 1958.  That's almost 54 years ago, and most definitely deserving of a vintage background and similar ephemera to showcase it.  

I have chosen a card sketch from the Let's Scrap sketch site for my inspiration.  It can sometimes be difficult to convert a card sketch to a layout because of the amount of "white space" that remains.  However, in this instance, it was exactly what I wanted.  The original photo was *so* small that all my attempts to enlarge it were fraught with blur.  I knew that I would be forced to use no larger than a 3x4 photo.  If I had created a very busy page, the small photo would have become lost.  Using this white space to my advantage allowed the small photo to remain the focal point!  

First, let me introduce you to Florence Harriet Berry Wallace, always know as Harriet (I just love that she used her middle name, as I do)!  She is on the far right, pictured here with her six siblings.


Next, let me share the sketch with you, created by Debby de Wilde, card sketch artist and part owner (along with Betty Anne Orr) of the Let's Scrap website:


One of the super things about the Let's Scrap website is that the sketches provided are for inspiration.  You can duplicate them exactly as shown, rotate them, flip them, reverse them or just see where they lead you as the artist.  You will see all the elements of this sketch--two ribbons, a bird, a ticket, and a photo (I will admit to omitting the clouds)--in my layout, but you will also notice that some have been moved!  First, the detail:


And, now, the finished layout:


This is the perfect time to visit the Let's Scrap website!  They are celebrating INSM (Inter)National Scrapbooking Month.  There are sketches, challenges, games and prizes!  Did I say PRIZES???  Come join almost 4,000 other scrappers and cardmakers from all around the world!  Quick and easy to join, and, it's free!

Thanks for stopping by!  Please do take a moment to leave a message, as it makes me feel that all this is worthwhile!

Cheers!

Friday, April 6, 2012

MAKING AN "ART JOURNAL"

I have wanted to make an art journal for quite a while, and have been searching Pinterest (yep, am addicted!) for pages others have created.  Yesterday, I actually bought a blank spiral-bound book that I will use for this journal.  I chose this book because I can lay it flat to work on the pages.  Inspired by my purchase of this book (along with a few tubes of acrylic paint and some foam brushes), I began my journey today to create a place to dabble in art, but, perhaps more importantly, to record some of my favorite quotes and personal thoughts on living this wonderful life with which I have been blessed.

I don't plan to share how each page was constructed (but will if you leave a question as a comment), but just want to share my pages with you.  Although this is not technically page 1 of the book (I randomly opened the book and started there), it is my first "entry."  The inspiration for this page comes from the fact that, today, I greatly regret giving up sewing as a young woman.

Thanks for stopping by.  It would please me greatly if you left a message letting me know you were here!

Cheers!