Recently, my husband and I have been guests at social functions which definitely needed a "thank you" card! The first card (below) was into the mail before I thought of photographing the steps I used to create it. For the second, I took photos as I went along to augment the directions and measurements.

The card we are creating is called an "easel card" and is mailed flat, but propped up by the buttons for display. The inspiration for the design of this card came from card sketch artist DebbyD on the Let's Scrap website.

Here are the tools and supplies you'll need to create this card:


The card we are creating is called an "easel card" and is mailed flat, but propped up by the buttons for display. The inspiration for the design of this card came from card sketch artist DebbyD on the Let's Scrap website.

Here are the tools and supplies you'll need to create this card:
- trimmer to cut your papers to the right dimensions
- paper scraps (no 12x12 papers were harmed in the creation of this card!)
- Scor-Pal or scoring blade for your trimmer
- tacky glue or other adhesive to layer your papers and affix the button(s)
- one large or two or more smaller buttons
- twine
- rub-on sentiment
Let's begin! Using a paper trimmer, cut your base paper 5" x 9". You will want to use a sturdy paper for your base.

Next, you will place your paper face up and score at 5" and 7".

The next step is to cut your smaller pieces of paper (use scraps!!). Here are the measurements of the papers you will cut:
- 5" x 5"
- 4-7/8" x 4-7/8"
- 4-1/4" x 2-1/4"
- 4-1/2" x 1-1/2" (you will need two of this size)
- 3" x 3"
- 2-7/8" x 2-7/8"
Here are the cut scraps and their approximate placement before adhering anything:

A quick "aside" here. I have always saved my larger "scraps" of paper and just threw them all in a box--but, sadly, never thought to use them and/or didn't want to take the time to find the right color for my projects. On the Let's Scrap website, there was a forum discussion about scraps, and one of the members shared that she stored her scraps by color. Well, that motivated me. It literally took hours for me to separate all my scraps by color, but now I actually use them. In this case, I was able to pull all these "blues" together in just a few seconds!
I find it easiest to assemble the smaller pieces, then attach that to the card base. You can arrange the pieces any way you chose, but the square block on top is where your sentiment will go. I always look for the easy way, so used a rub-on here, then added some twine:


I love using pop dots to raise up elements to add a bit of "dimension" to my projects, so have done this with the sentiment square:

The next step is to attach what you have just created to your card base. I have marked it here with a red "x" so you know that it goes on the end of the base that has been scored at that 7" mark.

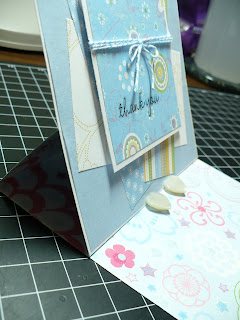
Here is what your card should look like. The scissors are holding the card in its "easel" position before we add those buttons!

I found two heart-shaped buttons and adhered them to the card base using tacky glue:

And here is the completed card with the buttons holding it in the easel position.

Since the celebration for which I am sending this "thank you" was centered on a baby, I wanted to add additional baby embellishments.

Lastly, when you lift up the front of the card, there is a place for you to sign you name or leave an additional comment:

The outside sentiment is "thank you" and the inside reads "~ for including us in your celebration!"
This is actually quite an easy card to make but packs a big "WOW" factor. I hope you will try it.
Thanks for coming by to view my blog! Please leave a comment so that I know you were here. Also, let me know if you made the easel card.
Cheers!