After being introduced to the wonderful art of scrap-booking by my daughter more than 8 years ago, I am definitely a scrap addict. I didn't love it at first. I actually thought it quite intimidating. I found myself copying others' styles and then comparing my work to theirs--with disastrous results. Over the first year, however, I began to feel more comfortable and to develop my own style. I actually began to allow a photograph or perhaps even a piece of paper or an embellishment to lead the way in developing a layout. I now find both enjoyment and fulfillment in my scrapbooking. If you’re ever feeling overwhelmed by what you think you should be able to do, think of actress Josie Bisset’s philosophy…“Dreams come a size too big so we can grow into them.”
Use of sketches as inspiration
I wish I had known about scrapbooking sketches when I first began to scrapbook my photographs. A sketch gives you the framework within which to create your own layout. It gives you placement of your title, any subtitles, photograph(s), decorative papers, embellishments, and even space for your journaling. You still retain the color choices and the right to alter and/or manipulate the orientation of the sketch. Even today, when I feel “stuck,” I generally reach out to one of the sketch websites offering up inspiration. One of my favorites remains About.com Scrapbooking. Rebecca Ludens continually provides new sketches on that site. Here’s a sketch challenge posted by Rebecca in February 2009 and my layout created in response:


You will notice that I rotated the layout on the right side 90 degrees counter clockwise to accommodate the orientation of my photographs.
For my layout today, I have chosen a 5”x7” photograph of my two young grandsons, Justin and Aidan.
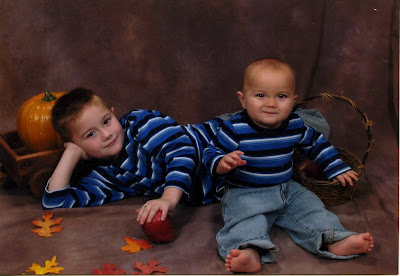
It quickly becomes obvious that my color choices include royal blue, and anything with a Fall “feel” to it...for instance, any color you might see in falling leaves. Since I am on a paper-buying hiatus, I searched through my stash of patterned paper and came up with the following possibilities:

I have chosen two patterned papers to use, as well as several colors of card stock for matting and/or accents. I will stop here while you catch your breath at the thought of using two patterned papers! You see, Grandpa was really not wrong when he wore those plaid trousers with his favorite striped shirt! I have to chuckle when I recall my panic at being forced to use three patterned papers in one layout in a recent challenge. Here’s some guidance from my friend Ann Marie (check out her “Vexed Angel” blog):
Don’t be afraid to mix patterns. Simply vary the size of each. Here, the stripes are the largest pattern, followed by medium-sized polka dots, and then small music notation on the tags and file folder.

Putting the puzzle together
I am not using a sketch for this layout, other than the one I have “formatted” in my mind. This means that I have a very basic idea of how I want my page to lay out and it may/may not have any resemblance to the end result! I will begin by placing my picture against the background patterned paper and sliding pieces of card stock beneath it to see how it looks. Remember, as the artist, it’s my decision—which brings me to another important point. If you have a scrap buddy whose opinion you highly value, go ahead and ask his or her opinion (yes, guys do scrapbook!). However, be wary of asking your husband’s opinion. He will most likely give it! Then, sometimes, it’s difficult to go ahead and do what you want anyway.
Moving along, I have now added some matting to my photo, as well as some “torn” paper to give my layout some texture and depth. Tearing my paper gave me the feel of less-than-perfect leaves as they fall and collect on the ground.
Ready? Set? Embellish!
One topic I would like to discuss before we finish this layout is that of embellishments. I scoured the internet, but could find no better description of embellishment as relates to the art of paper crafting than Webster, himself, who, in his second definition (Webster's Revised Unabridged Dictionary, 1913) describes it as “…that which adds beauty or elegance; ornament; decoration, as pictorial embellishments.”
These lovely little ornaments come in several categories (both purchased and handmade). The most basic are:
- Paper
- Stickers, rub-ons
- Chipboard
- Ribbons, fibers and fabrics
- Buttons
- Bling (anything that glitters)
- Brads, eyelets and other metal “goodies”
- Flowers, both paper and fabric
- Ephemera (in scrapbooking “lingo,” it means items intended to be used or important for only a single occasion or short time; for instance, pamphlets, programs, tickets, etc.)
- Found art* (anything not mentioned above, but which could be incorporated into a layout)
*I would like to quote from a new book by Roni Johnson, Teach Yourself Visually: Collage & Altered Art, who says of this classification, “Found objects can be summed up with the old saying, ‘One man’s trash is another man’s treasure.’ Or, in this case, another man’s art!” You can find information about Roni’s book on her website, including ordering information.
Adding texture, dimension, and sometimes “movement” to your page layout, embellishments come in every color of the rainbow, as well as every shape, size and texture imaginable. This diverse group of page enhancements has the potential to overpower any page layout with little warning, so choose them wisely. Remember, everything in moderation! Caution: If you allow it, embellishments can be the most expensive part of your layout! Not necessarily so, however, if you have a Dollar Store, Dollar Tree, Big Lots, or other discount store near you, where you can often purchase a whole sheet of such embellishments for 99 cents plus your tax.
The Finishing Touches
Adding your embellishments should signal to you as an artist that you are almost done. For my layout, I have added two blue brads on my journaling block to coordinate with the blue matting of my photo. I also added stickers and title letters that were part of the package of the paper I used (Basic Grey Archaic collection). As you know, the hardest part for me is the last step—that of journaling. Since the journaling to my grandsons is personal, I will omit it in this last photo, but I swear I will do it! Really!

I hope you are feeling a bit more confident now as you begin your first project. Don’t compare it to mine—I have no super powers; in fact, don’t compare it to anyone else’s either. Just be satisfied that your journey has begun!
okay 1) the grandsons are A-DOR-ABLE!!!! Oh my gosh I want to tickle those naked feet! :-) 2) You are so amazingly talented at explaining things in such easy to understand, step-by-step instructions! Thank you for taking the time (and a lot of it!) to post this Kay! I've said it before and I'll say it again...you are amazing!!!!
ReplyDeleteKay, I so agree with Molly. You are amazing. I love the way you take a mixture of paper crafting supplies and create a masterpiece. Thanks for explaining each step perfectly. I hope you never tire of hearing that you are one amazing scrapper. Thanks Michelle for starting your mom on this journey.
ReplyDeletehi Kay, just stumbled upon your blog and seeing your work, it's awesome! your grandsons are just sooooo cute :)
ReplyDeleteGreat Lo's Kay!! I love all those rich colours too, that last Lo is just lovely. Gorgeous scrap subjects your Grandsons!!
ReplyDeletecute layouts. love the paper on the just imagine one.
ReplyDeleteThank you for visiting and the kind works on my blog! I appreciate another follower...scrap bud! You have alot of nice information on here...I will be starting a scrapbook for my mom soon (when I get the time) and I'm sure I will find your layouts helpful! Thanks!
ReplyDeleteI put that link for the dt call on my blog for you. I think the call ends tomorrow!!
ReplyDeletehttp://craft-princess.blogspot.com/2009/09/new-challenge.html
Hello Kay, thanks for your comment on my blog and sorry that it took me so long to respond. I now have updated my blog after almost 3 months!!! I signed in as a follower and hope to see you again. Lovely picture of your grandsons and beautiful spread you created. Wish you a wonderful weekend.
ReplyDeletelove your inspiration!!! hoping to see more!
ReplyDeletehope all is well...
Linda
Hi Kay, thanks for this - I found it very helpful to follow the way you took us step by step from sketch to finished layout.
ReplyDeleteGenie
Hey, Kay, I never did get a chance to respond properly to your e-mail, but I really appreciated it, and I miss your blog, too! (((hugs)))
ReplyDelete